BRAND
BRAND
 PRODUCTS
 SALE
SALE
 BOUNDLESS ENERGY
 YOGA & AYURVEDA
 YOGA BLOG
The grip of your hands in bow pose (dhanurasana) affects the opening and relaxation of the shoulders. In addition, it provides space (instead of pressure) in the wrist and avoids tension in the forearms during the posture. Straight wrists therefore have effect on how much the kicking of the legs can lead the posture and thereby on your benefits from practicing this yoga posture.
Therefore, I will discuss the details of the grip in bow pose in this blog. In addition, you can read here about how you could use the direction of your eyes to improve your backbend. Last but not least, you will find a yoga pose breakdown of bow pose.
Benefits of bow pose
Practicing bow pose helps to strengthen the entire back side of the body while opening the front side of your body.
Bow pose variations
There are many variations of bow pose. In this blog I will discuss the variation that is practiced (among others) in the bikram yoga and absolute yoga series. This variation, whereby you grab the outside of the feet (and not on the ankles) is also practiced in many other yoga styles and helps to open the chest and shoulders. However, I will also discuss other bow variations (like the ashtanga bow pose) and its benefits.
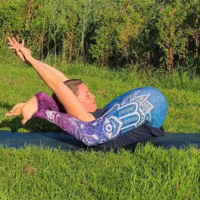
Grip of the hands
The wrists have to be straight in this yoga posture, to be able to relax the arms and shoulders (more). This helps with the rotation of the shoulders. In other words, the line from the knuckles of your fingers until your shoulders should be straight.
Grip at the feet
If you, like with the bikram and absolute series, grap the feet, the grip should be with the fingers instead of with the whole hands. On the outside of the feet, just below where the toes start and with the wrist straight.
The advantage of this grip is that where you grab is a little closer to you than when you try to grab the ankles, making this variant somewhat more accessible if you are less flexible without having to use a yoga strap.
The challenge here is to keep a firm grip (and not to let your feet slip). It helps to put pressure in two directions: from your hands to your feet and from your feet to your hands.
- Press your feet in your hands
- Press your thumbs against your index fingers
- Press your fingertips in your feet. Besides that this helps to create a firm grip (while the wrists remain straight), it also affects the nerve endings in the fingertips, allowing the shoulders to relax more.
In the beginning it may be difficult to keep a tight grip with straight wrist. However, the more you practice this as precise as possible, the sooner you will notice the difference in your shoulders. And the good news is that with practice your fingers will become stronger as well, which will make it easier to apply this technique progressively.
Also once you have the grip, it is often possible to relax the shoulders even more before you start to kick the legs up. What helps myself to relax the shoulders even more, is to imaginein the set-up that my arms are as relaxed like ropes. Don’t forget this part since an important goal of the grip is to relax the shoulders.
Grip at the ankles
In other yoga styles, such as the ashtanga yoga series, the grip is held at the ankles (and the feet are held together if possible). The grip is then automatically somewhat firmer. So you do need a little more flexibility to get to your ankles.
You may feel that with the ankle grip you get more into the back bend of your back (especially if you also keep your feet together, because there is less possibility to compensate from the hips). Of course you can also prevent the compensation at the hips with the grip of the feet if you pay close attention to the alignment of the legs: especially by not letting the knees go beyond hip with.
Alternatively, you can of course also work with a yoga strap and attach it around your ankles.
Other grip variations
There are numerous bow variations. As with most yoga poses, you use slightly different parts of your body with different versions of the bow pose.
For example, sometimes a grip is used where you grip from the inside of the feet. This already requires more flexibility from the shoulders to begin with. It is also possible to work on the flexibility in your shoulders in a bow pose with a yoga belt.
Before you just try something out, I recommend that you first review at what you want to work from a therapeutic perspective to create more balance in your body. How that exactly looks like differs per person and also changes over time.
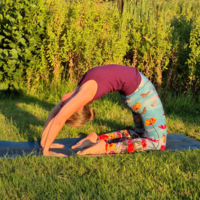
Drishti: focused gaze
The eyes show the direction for the spine
By applying the grip like discussed above, you can let your legs do the work and kick your feet back and up towards the ceiling. So, you don’t do anything active with the arms. But what else do you do to create the backbend?
What you do use in the bikram/gosh/absolute series is way more subtle: the eyes. You show your spine the direction for the backbend with your eyes. Just like when you drive a car or bicycle and you look to the right, you also direct your car or bicycle (unconsciously) in that direction. In the same way, your spine also responds at the direction of your eyes in yoga postures.
In the set-up, you look forward to create more length in the spine. This space between the vertebrae helps to create the backward bend in bow pose (with equal distribution over the vertebrae). Moreover, it is a good starting position for your head to be able to lift it slowly and evenly up when you move into the posture. In contrary to throwing your head back, what often happens when people keep their mouth on the floor in the set-up instead of looking forward (and thereby even creating a forward bend in the neck, while you want to prepare yourself for a backbend).
By moving slowly into the posture, you also give your nervous system the signal that the movement is save and controlled, so that it will allow your more space in your back over time with practice.
Once you start kicking up in bow pose, you start to look up towards the ceiling. Not only the head comes up, but also the eyes itself look up to show the direction for bending the spine. Eventually you will even be able to look back over the ceiling. Still, the feet (and thereby also the legs) are doing the active work. Over time and with practice, you will create the space to come further in the backbend. Micrometer by micrometer. Eventually you might even see your own toes in the posture.
Or look at the tip of your nose
In some other yoga styles, one promotes looking at the tip of your nose. The advantage of that (drishti) is it helps to go more inwards with your attention, which helps to better feel what you're exactly doing. Are you even able to feel where your head is (in space) in relation to the rest of your body?
In addition, this also helps to stay calm in the yoga posture. Especially because backbends are quite stimulating, this is an important advantage to keep your nervous system healthy in the long term.
Another advantage of looking at the tip of your nose is that it is easier to bend your neck only so far that it stays in line with the rest of your spine (and no more than that). After all, you want to create an equal bend over all vertebrae of the spine. While, if you keep looking upwards, the neck often bends more than the part of the spine on heart level. Also, a kink in the neck in backbends often goes together with too much compression in the lower back, which isn't comfortable and neither therapeutical.
What is the best dristhi?
Like usual, it depends....
In the 26&2 (bikram/ghosh/absolute) method, one usually looks up to give direction to your spine, which helps to come up against gravitation. While in other yoga styles (such as in the second series of ashtanga yoga) where one looks at the tip of the nose, which helps to go inwards with your awareness.
So, the different dristhi have different benefits and advantages. Which variation is best for you from a therapeutic point of view will depend on your circumstances and what you work on in the moment.
Personally, as a beginner I have benefited from the direction of looking upwards, but now I prefer to look at the tip of my nose. My advice is therefore mainly to feel well what the different versions do for you and perhaps adjust your preferred method in the long term if circumstances suggest it might be worth trying.
Bow pose breakdown
- Lie down on your belly, look forward and bend your both knees at the same time. Grab your feet or ankles from the outside. If possible grab them at the same time, so you use the left and right side of your back equally. However, to be able to grab them simultaneous, you already need already some strength in your back muscles. So maybe it will only happen over time with practicing consistently.
- Create a firm grip whereby you relax your shoulders as much as possible:
- If you grab the feet:
- Hold your feet from the outside, just below where the toes start.
- The grip is with the fingers instead of the whole hands, so you can keep your wrists straight.
- If you grab the ankles:
- You can point or flex your feet. The ashtanga version also uses pointed feet, however while keeping the toes or feet together if possible. The more the feet are together, the more you have to bend your back to come into bow pose.
- Press your feet/ankles in your hands.
- Press your thumbs against the index fingers.
- Press your fingertips into your feet/ankles.
- Keep your feet active (whether you point or flex your feet), to activate the legs.
- Look forward (in the set-up)to lengthen your spine.
- Relax the shoulders even more. For example by imagining that your arms are relaxed like ropes.
- If you grab the feet:
- Knees maximum hip width
- Take a deep breath and start kicking your feet back and up into your hands.
- Dristhi:
- To bring your body from the floor easier: look up. Not only with the position of your head, but also with your eyes.
- To turn more inwards and bend your back more evenly: look at the tip of your nose and feel where you could make more space in your back. Also move your breastbone forward and up.
- Keep kicking your feet (and therefore the legs) up towards the ceiling.
- Keep breathing in and out through the nose.
- Roll forward (but no rocking back and forth) until you’re lying on the soft part of your belly. If you are doing the bikram/gosh/absolute variation, you can roll forward until the feet are in the middle from a side perspective.
- In the posture you keep on:
- pressing your fingertips into your feet;
- pressing the thumbs against the index fingers;
- looking up or to the tip of your nose;
- activating the feet;
- kicking up;
- having knees at maximum hip width
- breathing in and out through the nose. If you haven't been practicing yoga for a very long time, you can breathe in as much as possible while you are moving into bow pose. Then (in the posture) exhale just a little to inhale again to your maximum lung capacity. This can help to prevent collapsing towards the floor (despite gravity). With time and practice you create more strength and ability to keep a normal breathing in bow pose.
- Come down slowly on an exhale. Slowly, so that you move with control and you signal your nervous system that everything is fine and that you are in control, so that your nervous system will allow more space between de vertebras over time (with practice). If you notice that it is difficult for you to come down slowly, probably you lost your breath somewhere in the posture. So next time, pay additional attention to your breathing.
- Make sure that you first come down out of the posture completely, including first putting your mouth on the mat/towel before you turn your head to the side. Since you are still in a backward bend when you come out of the posture, you don’t want to add a twist in your neck to prevent injuries. Coming out of the yoga posture calm, slowly and controlled is also part of your yoga practice.
Enjoy your Habits© today!
Aimée Kuntz
Never ever again miss anything from our yoga blog?
Do you want to implement more yoga lifestyle habits, step by step? To become more relax and create & enjoy your ideal life by heart? To live according to your intention? Your pursuit of happiness? It is our goal to help you with this.
SIGN UP FOR OUR NEWSLETTER and never again miss any of our yoga blogs again.